How to Protect Angular Code Against Theft and Reverse-Engineering
July 30th, 2021 | By Jscrambler | 8 min read

Angular is one of the most popular JavaScript frameworks, and this raises security concerns, namely how to protect Angular code against theft and reverse-engineering.
Since the Angular 2 release, Google has released five new versions in just two years. This TypeScript-based framework enables the easy development of front-end applications for the web and mobile.
With so many new Angular apps being released, it is urgent to ensure that developers can easily protect their Angular code with the most resilient forms of obfuscation and protection.
This in-depth tutorial explains how to integrate Jscrambler into Angular's build process in a few minutes. If you're new to Angular, read the official quickstart with Angular.
Prerequisites
To integrate Jscrambler into the Angular build process, you need two things:
Creating an Angular app
Configuring Jscrambler.
How to create an Angular application
We will use an Angular 7.0 boilerplate app. If you are protecting an app built using Angular 5 or earlier, refer to our documentation about integrating Jscrambler with Angular.
We also have a tutorial about AngularJS and the processes to protect the application with Jscrambler's solutions.
First, install Angular CLI using npm.
npm install -g @angular/cli
The Angular CLI will download and install all the required dependencies for the latest Angular version. We are using version 7.
We are ready to create our boilerplate app, which is the basis for this tutorial. Create this new app with the ng command available after the installation:
ng new angular-boilerplate
During the installation process, you will be prompted to decide if you want to add Angular routing, and you will also be able to choose a stylesheet format.
Pick the best options for you and wait for the installation to finish. We went with the default options.
Then, we can serve this newly created boilerplate app:
cd angular-boilerplate
ng serve
This is what we need to have a functional Angular app. Check if everything is in place by running the app in the browser. By default, it will run on http://localhost:4200/.
If you need more information, please refer to the official Angular documentation. You can also run ng help to check all available commands.
The base project structure of our Angular application is as follows:
angular-boilerplate/
|-- angular.json
|-- package-lock.json
|-- package.json
|-- tsconfig.json
|-- tslint.json
|-- dist/
| |-- angular-boilerplate/
|-- e2e/
| |-- src/
|-- node_modules/
|-- src/
| |-- app/
| |-- assets/
| |-- environments/
Angular.json contains all the CLI configurations for all the projects in the workspace. Options for building, serving, and testing tools that the CLI uses are defined here.
Package.json contains all the configurations related to npm, such as dependencies, versions, and scripts.
The src directory features all the source code of the application. The sources are then built and packed into the dist repertory. This is where our protected HTML and JavaScript files will be placed after the build.
How to Configure Jscrambler
If you haven't created a Jscrambler account, do it before moving forward.
All of Jscrambler's configurations will reside inside a single file:.jscramblerrc. Therefore, we create this file to specify which transformations we wish to use.
The quickest way to achieve this is via the Jscrambler Web App.
Once there, create a new app. In the Application Modes tab, select the Language Specifications and application type.
Next, select the transformations you want (check the Templates and Fine-Tuning tabs). We will use the Obfuscation template.
If you need help with these steps, please explore our guide about how to protect your JavaScript.
Now, download a JSON file with all these configurations, which will be used only for getting the required settings.
It is time to create a new file named .jscramblerrc in the Angular root folder.
Open the jscrambler.json file we downloaded and copy all its contents to the .jscramblerrc file.
After that, add two new sections to .jscramblerrc, which are filesSrc and filesDest (see below).
Your final .jscramblerrc file should look like this:
{
 "keys": {
   "accessKey": <ACCESS_KEY_HERE>,
   "secretKey": <SECRET_KEY_HERE>
 },
 "applicationId": <APP_ID_HERE>,
 "filesSrc": [
   "./dist/**/*.html",
   "./dist/**/*.js"
 ],
 "filesDest": "./",
 "params": [
   {
     "name": "whitespaceRemoval"
   },
   {
     "name": "identifiersRenaming",
     "options": {
       "mode": "SAFEST"
     }
   },
   {
     "name": "dotToBracketNotation"
   },
   {
     "name": "deadCodeInjection"
   },
   {
     "name": "stringConcealing"
   },
   {
     "name": "functionReordering"
   },
   {
     "options": {
       "freq": 1,
       "features": [
         "opaqueFunctions"
       ]
     },
     "name": "functionOutlining"
   },
   {
     "name": "propertyKeysObfuscation"
   },
   {
     "name": "regexObfuscation"
   },
   {
     "name": "booleanToAnything"
   }
 ],
 "areSubscribersOrdered": false,
 "applicationTypes": {
   "webBrowserApp": true,
   "desktopApp": false,
   "serverApp": false,
   "hybridMobileApp": false,
   "javascriptNativeApp": false,
   "html5GameApp": false
 },
 "languageSpecifications": {
   "es5": true,
   "es6": false,
   "es7": false
 },
 "useRecommendedOrder": true,
 "jscramblerVersion": "5.<X>"
}
Because we got this information via the Jscrambler Web App, our accessKey, secretKey, and applicationId fields are already filled.
If you wish to retrieve them manually, refer to our collection of tutorials to use Jscrambler to protect the client-side of your app.
Note that the params section specifies the transformations that will be used to protect your Angular app. These can be hand-picked by you. Select them in the web app or set them manually. You can find documentation on all the available transformations in the Jscrambler Help Center.
You can also change filesSrc to match the files you need or want to protect.
We recommend protecting all the.html and.js files in all Angular apps. You will identify the critical and essential parts with a better understanding of the project.
Using filesDest: './' will overwrite the files we send to protect, generating a new version.
Integrating Jscrambler in the Build Process
There are two ways to integrate Jscrambler into the Angular build process:
The Angular CLI
Webpack.
Integrating Jscrambler via Angular CLI
Using the Angular CLI is the most common way to generate your build. We will use our boilerplate app to showcase how to integrate Jscrambler into the build process.
The first step of our integration with Jscrambler is installing the Jscrambler API Client. Run:
npm install jscrambler --save-dev
To integrate Jscrambler into our application's build process via the Angular CLI, we must create a CLI hook in the scripts section of the package.json.
The section should look like this:
"scripts": {
  "ng": "ng",
  "start": "ng serve",
  "build": "ng build",
  "build:prod": "ng build --prod && jscrambler",
  "test": "ng test",
  "lint": "ng lint",
  "e2e": "ng e2e"
},
The "build:prod": "ng build --prod && jscrambler" hook will trigger the jscrambler command after finishing the build process.
For this command to be executable, we place the .jscramblerrc file created before in our project's root folder.
We are ready to protect our code and build our application via the Angular CLI.
npm run build:prod
This will create the production files in dist/<app-name>.
And you're done! Your HTML and JavaScript files are protected with Jscrambler against code theft and reverse engineering.
Integrating Jscrambler via Webpack
With the ng eject command being deprecated on Angular 6 and above, to use a Webpack build process, you must extend the underlying build configurations with an angular-builder.
We will use the custom-webpack config object builder, but feel free to use any other approach.
Install the builder.
npm i -D @angular-builders/custom-webpack
After doing so, we shall create our Webpack config file, which will be merged into the built-in configuration.
You might want at least two configurations for development and production builds.
For our production configuration, we only include the Jscrambler Webpack Plugin, which should be installed with the following command:
npm i --save-dev jscrambler-webpack-plugin
To keep it simple, we will leave our development webpack config empty, and our final production config will look like this:
const JscramblerWebpack = require('jscrambler-webpack-plugin');

module.exports = {
  plugins: [
    new JscramblerWebpack({
     chunks: ['main']
    })
  ]
};
We are protecting the main chunk, which contains all the application logic.
To start using those new webpack configurations, we shall update the build options in the angular.json file.
...
 "architect": {
   "build": {
     "builder": "@angular-builders/custom-webpack:browser",
     "options": {
       "customWebpackConfig": {
         "path": "./extra-webpack.config.js"
        },
        …
     },
     "configurations": {
       "production": {
         "customWebpackConfig": {
           "path": "./extra-webpack.config.prod.js"
         },
         …
         "vendorChunk": true,
   ...
Setting the vendorChunk flag to true will generate all the vendor content into a separate bundle file. This is optional.
Updating the package.json build script for production accordingly, it should look as follows:
"scripts": {
  "ng": "ng",
  "start": "ng serve",
  "build": "ng build",
  "build:prod": "ng build --prod",
  "test": "ng test",
  "lint": "ng lint",
  "e2e": "ng e2e"
},
With those steps, production builds (npm run build:prod) will use the Jscrambler Webpack client to protect your code and use the previously defined .jscramblerrc.
Testing the Protected Angular App
You can give your newly protected app a test run to check if everything has run successfully. First, you must install a local server where the app can run.
npm install http-server -g
Then, you need to set your Angular app's files to run on this local server.
http-server ./dist/angular-boilerplate/
As you should see on the terminal, you can run this server on two ports. One that is publicly available, and another that is specific to your machine.
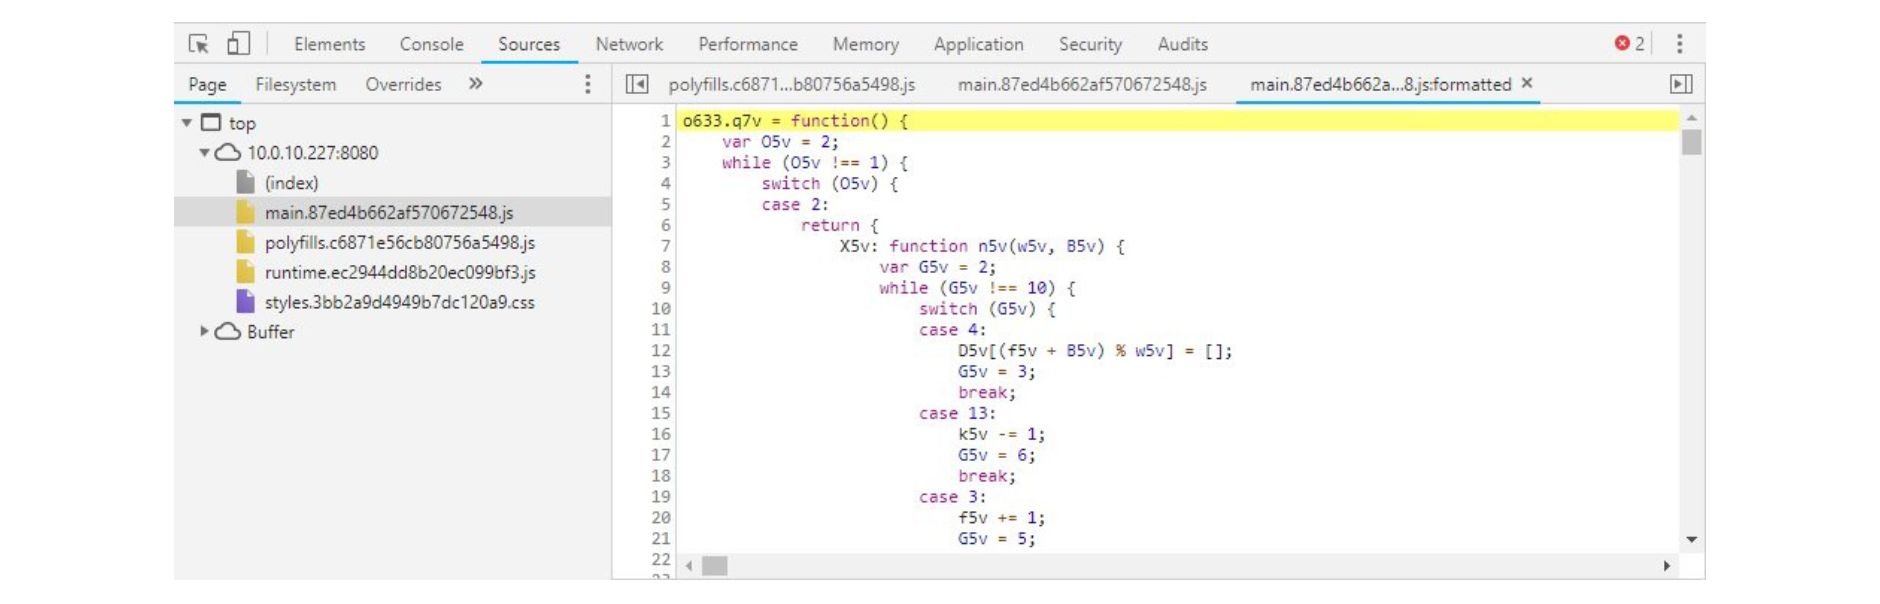
Open the provided URL, and your app will start in the browser.
You can now check what your protected files look like. To do this, open the browser's debugger and open the files from the "Sources" tab. The protected code should look like this:
Conclusion
Angular is a growing framework that empowers developers to create solid web and mobile applications by leveraging the conventions of data binding, services, and dependency injection.
If you're building apps that need to be protected against code theft, reverse-engineering, piracy, licensing violations, or malware injections, Jscrambler is a vital addition.
Integrating Jscrambler into Angular's build process is straightforward.
If you're in need of some further assistance, feel free to contact us!
Jscrambler
The leader in client-side Web security. With Jscrambler, JavaScript applications become self-defensive and capable of detecting and blocking client-side attacks like Magecart.
View All ArticlesMust read next
Monkey Patching: An Analysis of Code Poisoning JavaScript
Monkey patching enables dynamically changing the behavior of JavaScript. While it can be used legitimately, it can also enable attacks like Magecart.
October 15, 2019 | By Jscrambler | 6 min read
Full-stack JavaScript Source Code Protection
With Node.js you can do Full-stack JavaScript Web Apps. JScrambler 3.6 introduces Node.js support and is now the first Full-stack JS Protection solution.
September 8, 2014 | By Pedro Fortuna | 4 min read

